Problem
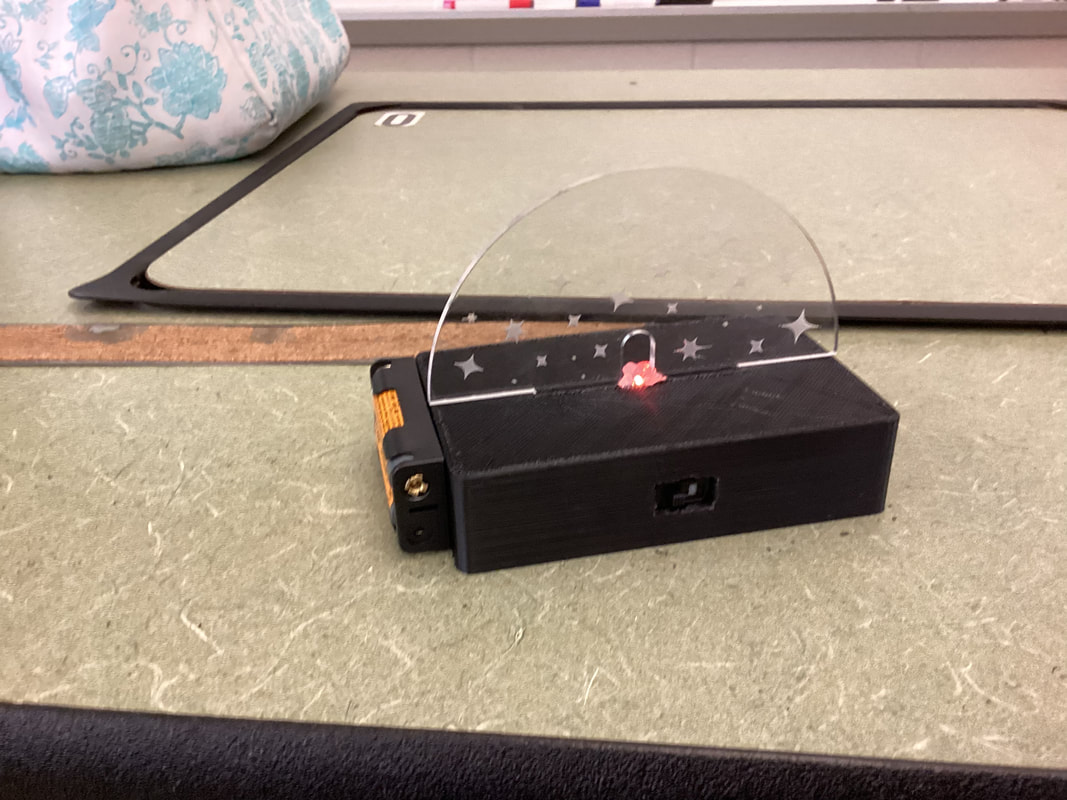
This project is to take Mrs. Z's creation of the Night Light and improve upon it. She had a basic night light with a usb cord. I built upon it and changed the usb to a battery pack and a switch instead.
Solutions
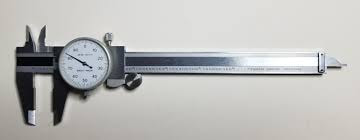
Measuring with a dial caliper is superior to a ruler, because it is much more precise. Now measuring with a dial caliper is pretty simply. To start you have to make sure the hand is at zero when it position is at zero. You can do this by twisting the face of the dial caliper. Then you have a circle on the side you use to open and close. You want to open it, then you want to stick the LED in between the prongs that opened. Then close the prongs around it to recall a measurement. So on the ruler part which is the longways measure meant that would be the first part, so say it's in 1 inch then it would be 1 inch then whatever decimal is after. So 1.6 if it is set on six then we go on the frame of the dial caliper. The frame shows us numbers in the tens, and our calculation is in the 20's, so then the calculation is 1.62. The last measurement is going to be the number it is on in the twenties so say it's a little after the 3 in the twenties place. So I would put my calculation down as 1.624.
I chose my design choice because I wanted mine to be more on the practical side. I didn't do anything extravagant and to take away time from my switch and battery pack I wanted to add. I wanted it to be sturdy and reliable so that it wouldn't roll around, be easily knocked over, or to easily fall apart. So I chose a box base, because it is sturdy, reliable, and can hold the battery pack on the outside, because I made sure it fit to those requirements. Now for the acrylic, I just made a simple star design so that I didn't make it complicated and it looked nice.
Construct and Test
I was lucky and did not have to redesign even though I could have. For my switch the hole I made for it was too small because of the way the switch was when I measured. So I got help from welding and they took a grinder and ground it up a little bit so that I could go in with a file and smooth it out. Then I was able to pop it in there. Then the other thing was the area I made for my LED was quite big, and for this instance, I could've gone back and fixed it but I decided against it.
In building my night light, I first made sure everything fit, by grinding filing, and whatever else I needed to do. Then I went in and soldered my wires together, and made sure everything looked right. Then I went ahead and hot glued my battery pack onto the side, and hot glued the LED into place. Then I inserted my acrylic and it fit right in with a push but stays in place.
The resistor I used was Orange Brown Red and Gold which is 310 +- 5%. I read this by using my formula sheet.
Soldering is pretty simple in my opinion, but the way I was soldering sometimes I needed an extra hand. So I soldered my simple wires together, and then had Justin come hold my battery pack wires so that I could solder them to the other wires. I did this, because these wires were smaller and needed more grab then the device Mrs. Z let us borrow.

Evaluate Solution
So some things I had to modify were that I needed to make the hole bigger for my switch, and something I would switch is definitely adding a base. Then I would definitely make the hole bigger in the back So that my battery pack wires fit through it. This would make my device effective and efficient. I would also make my LED hole on my acrylic smaller so that then it would light up better.
Present Solution
I learned about taking my ideas and building upon them, and don't think anything is a bad idea. Take criticism with an open mind. Then I would also say that James helped me get back with soldering, because it felt like I hadn't done it in a while. Some skills I learned are how to make sure everything is on time and you are working on it effectively, and taking notes on everything helps a ton. I would say I was great with working on this project and I never got in over my head.
